8 min to read
Custom Robot in ROS
Build custom robot using ROS and Gazebo
ROS is really an excellent tool to create your bots and simulate them with real-world scenarios. In this tutorial, we will dive into how you can create your own custom robot in ROS.
For demonstration, we will create a 4 wheeled bot with LiDAR and a Camera in it.

Video Link
Install ROS
Refer to the official guide of ROS: http://wiki.ros.org/ROS/Installation
# For Ubuntu 20
sudo apt install ros-noetic-desktop-full
Clone Repository
To follow along with this tutorial you need to clone my repository.
Link: https://github.com/bytesByHarsh/Robotics_ws
Along with Atom Bot, that is described on this tutorial, there are other bots as well do check them out.
Atom Bot
This is a 4 Wheeled robot with camera and lidar installed in it.
Build the workspace
git clone https://github.com/bytesByHarsh/Robotics_ws
cd Robotics_ws
catkin_make
source devel/setup.sh
Launch Atom
roslaunch atom world.launch
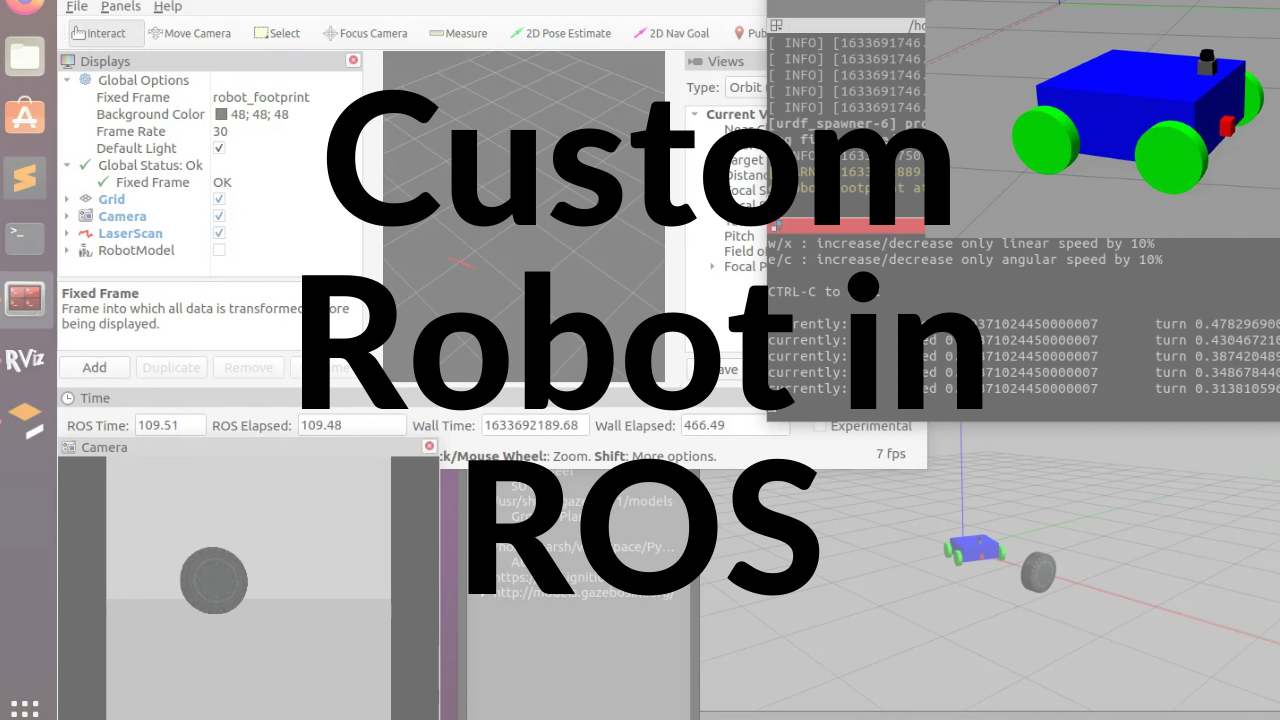
This will open the following windows:
Your Gazebo world will be having just the Atom Bot. Here you can see on top we have our LiDAR and at front we have our camera.
Build the Bot
Let’s start by creating XACRO files.
Read More: http://wiki.ros.org/xacro
Xacro (XML Macros) Xacro is an XML macro language. With xacro, you can construct shorter and more readable XML files by using macros that expand to larger XML expressions.
atom.xacro
<!-- Define Different Robot Properties -->
<xacro:property name="robot_name" value="atom" />
<xacro:property name="robot_chassis_mass" value="15"/>
<xacro:property name="camera_mass" value="0.1"/>
<xacro:property name="hokoyu_mass" value="1e-5"/>
Add Links
Each component is considered as link
<!-- Make Chassis of Bot -->
	<link name="chassis">
		<pose>0 0 0.1 0 0 0</pose>

		<inertial>
			<mass value="${robot_chassis_mass}"/>
      		<origin xyz="0.0 0 0" rpy=" 0 0 0"/>

      		<inertia
      			ixx="0.147116667" ixy="0" ixz="0"
      			iyy="0.334951167" iyz="0"
      			izz="0.3978345"
      		/>
		</inertial>

		<collision name="collision">
			<origin xyz="0 0 0.05" rpy=" 0 0 0"/>
			<geometry>
				<box size="0.5 0.5 0.2"/>
			</geometry>
		</collision>

		<visual name="chassis_visual">
			<origin xyz="0 0 0.05" rpy=" 0 0 0"/>
			<geometry>
				<box size="0.5 0.5 0.2"/>
			</geometry>
		</visual>
	</link>
Similarly add for Wheels, camera and LiDAR. Checkout the GitHub Repository for complete code
Add Different Joints
For Wheels continuous type is used and for camera and lidar fixed type is used.
<!-- Define Joints -->

	<!-- Right Wheel Joint Back-->
	<joint type="continuous" name="right_wheel_hinge_back">
	    <origin xyz="-0.2 -0.30 0" rpy="0 0 0" />
	    <parent link="chassis"/>
	    <child link="right_wheel_back" />
	    <axis xyz="0 1 0" rpy="0 0 0" />
	    <limit effort="10000" velocity="1000" />
	    <dynamics damping="1.0" friction="1.0" />
	</joint>

  <!-- Camera Joint -->
	<joint name="camera_joint" type="fixed">
		<origin xyz="0.26 0 0" rpy="0 0 0" />
		<parent link="chassis"/>
		<child link="camera" />
		<axis xyz="0 1 0"/>
	</joint>
Similarly add for other links as well.
Add Color
<!-- Color of bot -->
	<gazebo reference="left_wheel_front">
		<material>Gazebo/Green</material>
		<kp>1000000.0</kp> <!-- kp and kd for rubber -->
		<kd>100.0</kd>
		<mu1>1.0</mu1>
		<mu2>1.0</mu2>
		<maxVel>1.0</maxVel>
		<minDepth>0.00</minDepth>
	</gazebo>
Include Gazebo Plugins
<!-- Motor, Camera and Lidar Simulation -->
<xacro:include filename="$(find atom)/urdf/atom.gazebo" />
Gazebo Plugins
In order to run all the sensors and actuators we need to connect our robot links to gazebo plugins
Skid Steer Drive
For controlling 4 wheeled robot skid steer drive plugin is used and for 2 wheeled robot differential drive plugins are used.
<gazebo>
<plugin name="skid_steer_drive_controller" filename="libgazebo_ros_skid_steer_drive.so">
      <updateRate>10.0</updateRate>
      <robotNamespace>/</robotNamespace>
      <leftFrontJoint>left_wheel_hinge_front</leftFrontJoint>
      <rightFrontJoint>right_wheel_hinge_front</rightFrontJoint>
      <leftRearJoint>left_wheel_hinge_back</leftRearJoint>
      <rightRearJoint>right_wheel_hinge_back</rightRearJoint>
      <wheelSeparation>0.4</wheelSeparation>
      <wheelDiameter>0.2</wheelDiameter>
      <robotBaseFrame>robot_footprint</robotBaseFrame>
      <torque>10</torque>

      <topicName>cmd_vel</topicName>
      <odometryTopic>odom</odometryTopic>
      <odometryFrame>odom</odometryFrame>

      <commandTopic>cmd_vel</commandTopic>
      <topic_name_twist>cmd_vel</topic_name_twist>
      <topic_name_odometry>odom</topic_name_odometry>
      <topic_name_joint>joint</topic_name_joint>

      <broadcastTF>true</broadcastTF>

      <covariance_x>0.0001</covariance_x>
      <covariance_y>0.0001</covariance_y>
      <covariance_yaw>0.01</covariance_yaw>

    </plugin>

  </gazebo>
Camera Plugin
For camera we need to specify:
- Type
- Name
- Update Rate
- FOV
- Format
- Link Name
- Topic Name
<!-- camera -->
  <gazebo reference="camera">
    <sensor type="camera" name="camera1">
      <update_rate>30.0</update_rate>
      <camera name="head">
        <horizontal_fov>1.3962634</horizontal_fov>
        <image>
          <width>800</width>
          <height>800</height>
          <format>R8G8B8</format>
        </image>
        <clip>
          <near>0.02</near>
          <far>300</far>
        </clip>
      </camera>
      <plugin name="camera_controller" filename="libgazebo_ros_camera.so">
        <alwaysOn>true</alwaysOn>
        <updateRate>0.0</updateRate>
        <cameraName>camera</cameraName>
        <imageTopicName>rgb/image_raw</imageTopicName>
        <cameraInfoTopicName>rgb/camera_info</cameraInfoTopicName>
        <frameName>camera</frameName>
        <hackBaseline>0.07</hackBaseline>
        <distortionK1>0.0</distortionK1>
        <distortionK2>0.0</distortionK2>
        <distortionK3>0.0</distortionK3>
        <distortionT1>0.0</distortionT1>
        <distortionT2>0.0</distortionT2>
      </plugin>
    </sensor>
  </gazebo>
LiDAR:
For LiDAR we need to specify:
- Type
- Name
- Update Rate
- Link Name
- Topic Name
- Noise (Optional)
- Range
<!-- hokuyo -->
  <gazebo reference="hokuyo">
    <sensor type="ray" name="head_hokuyo_sensor">
      <pose>0 0 0 0 0 0</pose>
      <visualize>false</visualize>
      <update_rate>40</update_rate>
      <ray>
        <scan>
          <horizontal>
            <samples>720</samples>
            <resolution>1</resolution>
            <min_angle>-1.570796</min_angle>
            <max_angle>1.570796</max_angle>
          </horizontal>
        </scan>
        <range>
          <min>0.10</min>
          <max>30.0</max>
          <resolution>0.01</resolution>
        </range>
        <noise>
          <type>gaussian</type>
          <!-- Noise parameters based on published spec for Hokuyo laser
               achieving "+-30mm" accuracy at range < 10m.  A mean of 0.0m and
               stddev of 0.01m will put 99.7% of samples within 0.03m of the true
               reading. -->
          <mean>0.0</mean>
          <stddev>0.01</stddev>
        </noise>
      </ray>
      <plugin name="gazebo_ros_head_hokuyo_controller" filename="libgazebo_ros_laser.so">
        <topicName>/scan</topicName>
        <frameName>hokuyo</frameName>
      </plugin>
    </sensor>
  </gazebo>
World File
This file describes the initial world that gazebo will spawn on launching the ROS environment.
<?xml version="1.0" ?>
<sdf version="1.4">
	<world name="default">
		<include>
			<uri>model://ground_plane</uri>
		</include>

		<!-- Light source -->
		<include>
			<uri>model://sun</uri>
		</include>

		<!-- World camera -->
		<gui fullscreen='0'>
			<camera name='world_camera'>
				<pose>4.927360 -4.376610 3.740080 0.000000 0.275643 2.356190</pose>
				<view_controller>orbit</view_controller>
			</camera>
		</gui>
	</world>
</sdf>
Launch File
This file is used to run multiple ROS nodes together.
World.launch
First we need to give robot pose:
	<!-- Robot pose -->
	<arg name="x" default="0"/>
	<arg name="y" default="0"/>
	<arg name="z" default="0"/>
	<arg name="roll" default="0"/>
	<arg name="pitch" default="0"/>
	<arg name="yaw" default="0"/>
	<arg name="robot_name" default="atom"/>
Include Robot Description Launch file
	<!-- Launch other relevant files-->
	<include file="$(find atom)/launch/robot_description.launch"/>
Add World File:
	<!-- World File -->
	<arg name="world_file" default="$(find atom)/worlds/empty.world"/>

	<!-- Launch Gazebo World -->
	<include file="$(find gazebo_ros)/launch/empty_world.launch">
		<arg name="use_sim_time" value="true"/>
		<arg name="verbose" value="false"/>
		<arg name="debug" value="false"/>
		<arg name="gui" value="true" />
		<arg name="world_name" value="$(arg world_file)"/>
	</include>
Spawn The robot:
	<!-- Spawn My Robot -->
	<node name="urdf_spawner" pkg="gazebo_ros" type="spawn_model" respawn="false" output="screen"
		args="-urdf -param robot_description -model atom
			  -x $(arg x) -y $(arg y) -z $(arg z)
			  -R $(arg roll) -P $(arg pitch) -Y $(arg yaw)"/>
Launch RVIZ (Optional)
<!--launch rviz-->
	<node name="rviz" pkg="rviz" type="rviz" respawn="false"
		  args="-d $(find atom)/default.rviz"/>
Control The Bot
For controlling the bot Teleop Twist keyboard library is used.
Installation (Ubuntu 20):
sudo apt-get install ros-noetic-teleop-twist-keyboard
Execution:
rosrun teleop_twist_keyboard teleop_twist_keyboard.py
Read More: http://wiki.ros.org/teleop_twist_keyboard
Hope you liked this brief demo.


Comments